Search This Blog

Wednesday, March 4, 2015

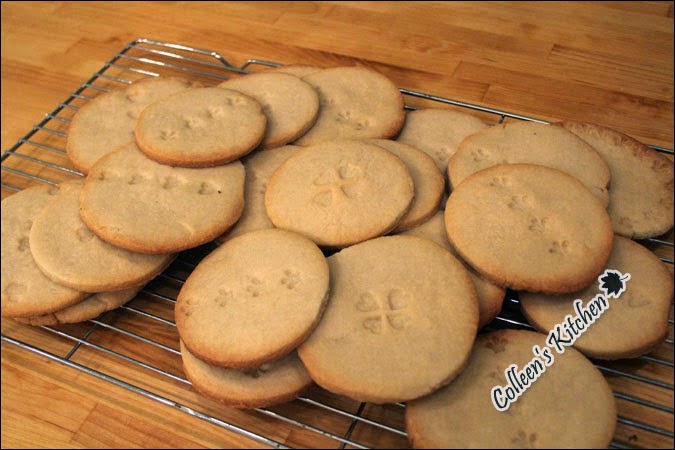
[Basic Butter cookie] A perfectly buttery and crumbly cookie to boost your morning~

I know cookie is not the best thing to have for breakfast. 


But, it's also true that it boosts my mood on monday morning and gives me something to look forward to when I  have baked some delicious cookies the night before. Yes, I admit that having one or two big butter cookies is my secret guilty pleasure I'd like to keep to myself.
Nonetheless, I must share this butter cookie recipe since it's too good not to. :) I can't quite believe that I didn't post this simple, but scrumptious recipe at my blog. I've used this recipe for past 2-3 years so that I can assure you that it's a real foolproof recipe.


I tested a few different butter cookie reipes, to find the "perfect fit" for me. I want my butter cookie to be buttery, crumbly and filling so that I don't need to eat more than a couple of them at a time.


And, as we all know, you'd better to stick to it when you find the one! 

Here goes the basic butter cookie recipe I like very much:
(adapted from Celebrations)


INGREDIENTS
1 cup butter, room temperature
1 cup sugar
1 egg, room temperature
2 2/3 cups all-purpose flour
1/4 teasoon salt
2 teaspoons vanilla extract


Directions


1. Cream your butter and sugar together in a stand mixer until light and fluffy. It takes give and take about 5 minutes. 


2. Next, beat in the egg and vanilla.


3. Sift the dry ingredients in a separate bowl, before adding slowly into the sugar and butter mixture.  You don't want to overmix batter unless you want it to be kind of chewy. Mix it until just combined.


4. Form the batter into a disque and wrap it completely and chill in the fridge for at least one hour. For best results, also chill your cookie sheets before baking to maintain the shapes as they are formed.


5. Preheat your oven to 400 degrees. 


Meanwhile, press the dough onto ungreased cookie sheets to desired thickness. 


or you can cut them into equal sizes and shape with a rolling pin.


You can make any type of desired patterns in the cookies. I used the cookie stamps I acquired recently. 


6. Bake for 8-10 minutes or until golden around the edges. If you bake over 10 minutes, edges start to get brown quickly. 


Let sit for 1-2 minutes, then remove to a cooking rack to cool.


Each time I bake them, I have a grand hope that the batch last for at least 3-4 days, but it never happened so far. Maybe in the future.... I didn't totally give up my hope yet, you see~ Believe me, they go away really quickly. 


I'm sure they are just good enough to boost your morning!
Enjoy~

Tuesday, May 27, 2014

[Sweet pea & shrimp pasta] A wonderfully easy and quick dinner in 15 minutes


A few weeks ago, Remi and Mr. D went to a local supermarket for a quick grocery shopping, from which Remi brought a recipe card and presented to me as an "ordinary-day present." :) 

It was a Jamie Oliver's pasta recipe~ Remi knows well that I love Jamie Oliver's recipes especially because his recipes don't disappoint. They usually turn out great and this quick sweet pea & shrimp pasta was not an exception. I had all the needed ingredients well resting in my not-so-big freezer. Hooray. I can free some room in my freezer by making this pasta! We all love pasta and pasta is, surprisingly, the main carbohydrate of my household. Remi's ordinary-day present turned out to be an extraordinary one! :) Jamie Oliver named this pasta Jools' sweet pea & shrimp pasta shells. So I'm not sure whether it's Jamie's recipe or his wife's. It doesn't matter (why would it as far as it tastes great! :))


I find this recipe great mainly because of two reasons. First, you can make it without any extra grocery shopping.  You must have frozen cooked shrimps and peas waiting for you somewhere in your freezer. Second, you can make it in 15 minutes from start to finish. We all need such quick items for a busy weekday dinner, don't we? In that sense, you wouldn't find many real food that can be prepared as quickly as this pasta. :) And the best thing about this dish is that it's amazingly tasty.

The only adjustment I made was the replacement of red chili with sweet chili since Pablo cannot anything spicier than a dill pickle :( OMG, I didn't expect this effect, but a small sweet chili gave a fantastic flavour to the recipe. You should definitely sautée sliced sweet chili before adding other ingredients!

Here goes the recipe.


Ingredients
(serves 4)

11 oz (330g) dried pasta shells
4 cloves garlic
1 fresh sweet red chili
olive oil
7 oz (200g) frozen peeled cooked shirmp
1 + 1/2 cups frozen peas
1 tablespoon tomato paste
1 oz (30g)) Parmesan cheese (optional)
 Reserve 1 Cup of pasta cooking water (optional)

Directions


1. Cook the pasta in a large boiling salted water to al dente, according to package instructions.


2. Meanwhile, peel and slice garlic cloves, and slice red sweet chili thin.


3. heat olive oil in the frying pan, and then, add garlic and sweet chili sliced on a medium heat.


4. Fry until lightly golden brown, then add shrimp, peas and tomato paste.

Then add some boiling cooking pasta water from the pasta pan, and simmer slowly until the pasta is ready.

5. Once cooked, drain pasta.


6. Season the sauce, then toss with the pasta.


7. Grate over the Parmesan cheese, if desired.


Divide between the bowls and serve!

It looks simple, doesn't it? It's a truly simple, but delicious pasta!
I already know that this recipe will live long in my kitchen! :)

Enjoy.

Jools' Sweet Pea & Shrimp Pasta Shells


Tuesday, April 8, 2014

[Stuffed Mushrooms] Red Lobster style mushrooms stuffed with shrimp, rice and broccoli

 A couple of weeks ago, our team had a lunch at Red Lobster to celebrate a colleague's retirement. I ordered  "Fresh Tilapia roasted with crab-and-seafood stuffing" and was hesitating whether to order an appetizer or not. Then a couple of people recommended this dish called "seafood stuffed mushrooms". As it looked delicious in the photo already, I placed an order for the stuffed mushrooms... and guess how the dish was. Yes. as you had a good guess, I just loved it. It was amazingly tasty and very filling. 


But! even though I couldn't  finish my Tilapia, which was also delicious, I was glad that I had had a great appetizer quite filling. While eating the seafood stuffed mushrooms, I also checked ingredients. The indisputable ingredients were crab, broccoli, red pepper, rice, and cheese. As it didn't look much complicated, so I came up with my own recipe. Believe it or not, my stuffed mushrooms were just scrumptious!!! You should try my recipe for stuffed mushrooms, and I am confident that you will like this dish. Oh, actually, I tend to like any kind of stuffed vegetables such as stuffed tomatoes.(I thought I had posted a recipe for stuffed tomatoes, but I hadn't! I should better do it very soon)


Here goes the recipe for the seafood stuffed mushrooms.


Ingredients
1 lb fresh mushrooms
1/6 - 1/4 red pepper, finely chopped
4-5 florets broccoli, finely chopped
1/2 lb shrimp or crabmeat
1/4 cup basmati (or long grain) rice, soaked in the tepid water for 20 minutes
1 cup white cheddar or mozzarella cheese
salt and pepper


Directions

1. Wash and soak rice in tepid water
2. Preheat oven to 350-375 F (= 180 - 190 Celsius)
3. Wash and dry mushrooms and remove stems.

4. Cut out the edge of the mushrooms with a small teaspoon so that you can stuff more filling.

5. Chop shrimp, red pepper, and broccoli as fine as possible.

6. Combine shrimp, red pepper, broccoli, and drained rice. 
Season with salt and pepper. 
Red pepper and shrimp will emit nice flavour while being cooked.

7. Stuff the mushrooms with the prepared filling.

8. Pour 1/4 C half & half or table cream in the baking dish before placing mushrooms in the dish.

9. Sprinkle mushrooms with generous amount of grated cheese.

10. Bake for 20 minutes in the preheated oven.

11. Broil for 1-2 minutes to brown the tops of the mushrooms.


Then, that's it. Some delicious stuffed mushrooms are ready!
It's really easy, isn't it? Nonetheless, it's wonderfully delicious.

Enjoy!


Shrimp Stuffed mushrooms

Monday, March 31, 2014

[Braided Chocolate Ganache (Nutella) Bread] An Easy-to-make bread with a beautiful star shpe

When somebody showed me a photo of this beautifully twisted bread at work, I already was decided to bake this bread on that night. And, of course, I did. I must have said before that baking is, for me,  not only for eating the end result, but more for enjoying the process of baking. I enjoy piping macarons, shaping bread, and decorating cupcakes. 


Therefore, it was only natural for me to like this star bread recipe, as soon as I set my eyes on it. Believe me, it looks more complicated than it looks. I made two in a row. I had to substitute (?) Nutella with real chocolate ganache, because of Pablo's allergy to all the tree nuts and peanuts. As you might have known, Nutella is a chocolate hazelnut spread. Pablo had a hard time accepting the fact that he couldn't have Nutella. 

Instead, I've been making chocolate ganache which is a pure chocolate spread, as a substitute for Nutella. This time was not an exception. I made chocolate ganache to spread between two discs of bread dough. I am glad I made chocolate spread myself  because Pablo loved the bread a lot. When I made it for the first time, I doubled the ingredients and made two braided chocolate ganache breads with two different star shapes. We ate one at home, and I brought the other one to work where the bread was a big hit. It's surprisingly easy to make, but it sure is a crowd pleaser. If you use Nutella spread instead of making your own, the process of making this bread becomes even easier.


Oh, by the way, I used the "dough" function of my bread machine up to the first rise. You can do it in an analogue way which is totally fine.


This braided bread is very soft, tender, but not so sweet. I would say it's a perfect breakfast bread. :)
Here goes the recipe.
(adapted from Good Home Design)


Ingredients
2 1/2 cups of all purpose flour;
1/2 teaspoon of yeast;
1cup of water;
1 teaspoon of salt;
1 tablespoon of sugar;
some Nutella (or chocolate Ganache cream: recipe will follow)
cornmeal;
1 egg;


Directions

1. I put flour, yeast, water, salt and sugar at once in the bowl of the bread machine.
Alternatively, 

2. Dissolve yeast with a quarter of a cup filled water, poured into a small bowl. Let it rest for 10 minutes.

3. In another bowl mix in the appropriate amount of flour, salt, and sugar. 

4. Add the yeast and mix at a low speed. Smoothly turn the speed to medium and keep turning for 6-7 minutes.


5. Cover it with a plastic wrap  in a warm place it will double in size.

 6. Roll half of the dough in order to make a circle. 


7. Place it on a parchment-lined or silicon-lined baking sheet. Sprinkle the sheet beforehand with cornmeal so that it will not stick to the baking sheet.
Take the Nutella or chocolate gahache cream and pour an even layer on the surface.
half an inch of margin of dough all around, should be left.

Place another roll off dough (Nutella free) on top. 
Afterward, place it on a lined baking sheet.


Use a scissor to cut the dough down the middle, but keeping one end intact. 


Turn the cut side toward the top, then twist the ends of the dough overtop each other. 


Do this for every cut you made. 

Cover it with plastic wrap and let the dough sit in a dry place for 20 minutes or so.

Preheat the oven to 350°F (180 °C)

Brush with egg wash. 
Then, bake at this temperature for about 20 minutes.
Raise the oven temperature to 425°F (210 °C) and bake for another 5-7 minutes.


It's a delicious bread everyone likes!


And now here is the recipe for the Chocolate ganache.
(adapted from Martha Stewart Living)

INGREDIENTS
2/3 cup heavy cream
6 ounces semisweet chocolate (or 180 g), finely chopped
1 tablespoon light corn syrup


DIRECTIONS


a. Bring cream to a boil in a small saucepan. 


b. Remove from heat, and add chocolate and corn syrup. Let stand for 5 minutes. 


c. Whisk until smooth. Transfer to a bowl, and let cool, stirring often. Use immediately


It's not difficult at all, is it?


Enjoy baking and the end-result!

Braided Chocolate Bread