Search This Blog

Showing posts with label Baking - Cookies. Show all posts

Wednesday, March 4, 2015

[Basic Butter cookie] A perfectly buttery and crumbly cookie to boost your morning~

I know cookie is not the best thing to have for breakfast. 


But, it's also true that it boosts my mood on monday morning and gives me something to look forward to when I  have baked some delicious cookies the night before. Yes, I admit that having one or two big butter cookies is my secret guilty pleasure I'd like to keep to myself.
Nonetheless, I must share this butter cookie recipe since it's too good not to. :) I can't quite believe that I didn't post this simple, but scrumptious recipe at my blog. I've used this recipe for past 2-3 years so that I can assure you that it's a real foolproof recipe.


I tested a few different butter cookie reipes, to find the "perfect fit" for me. I want my butter cookie to be buttery, crumbly and filling so that I don't need to eat more than a couple of them at a time.


And, as we all know, you'd better to stick to it when you find the one! 

Here goes the basic butter cookie recipe I like very much:
(adapted from Celebrations)


INGREDIENTS
1 cup butter, room temperature
1 cup sugar
1 egg, room temperature
2 2/3 cups all-purpose flour
1/4 teasoon salt
2 teaspoons vanilla extract


Directions


1. Cream your butter and sugar together in a stand mixer until light and fluffy. It takes give and take about 5 minutes. 


2. Next, beat in the egg and vanilla.


3. Sift the dry ingredients in a separate bowl, before adding slowly into the sugar and butter mixture.  You don't want to overmix batter unless you want it to be kind of chewy. Mix it until just combined.


4. Form the batter into a disque and wrap it completely and chill in the fridge for at least one hour. For best results, also chill your cookie sheets before baking to maintain the shapes as they are formed.


5. Preheat your oven to 400 degrees. 


Meanwhile, press the dough onto ungreased cookie sheets to desired thickness. 


or you can cut them into equal sizes and shape with a rolling pin.


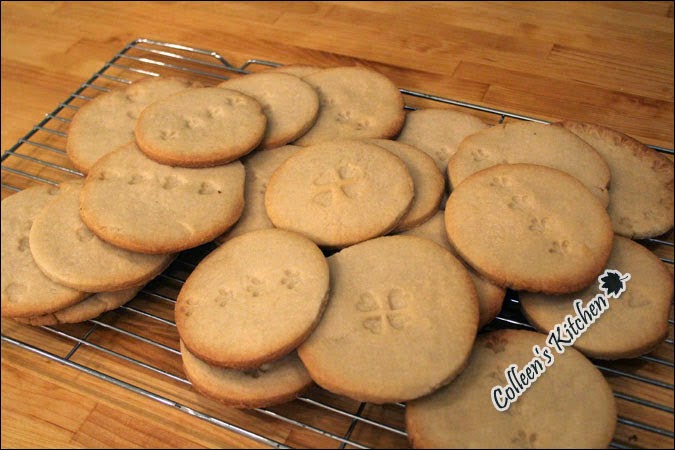
You can make any type of desired patterns in the cookies. I used the cookie stamps I acquired recently. 


6. Bake for 8-10 minutes or until golden around the edges. If you bake over 10 minutes, edges start to get brown quickly. 


Let sit for 1-2 minutes, then remove to a cooking rack to cool.


Each time I bake them, I have a grand hope that the batch last for at least 3-4 days, but it never happened so far. Maybe in the future.... I didn't totally give up my hope yet, you see~ Believe me, they go away really quickly. 


I'm sure they are just good enough to boost your morning!
Enjoy~

Wednesday, January 29, 2014

[Chocolate Black Bean Cookies] Unconventionally Delicious Cookies with loads of healthy ingredients (Gluten-free)

When a friend told me about the cookies using black bean, actually I laughed it off, only because it didn't sound tasty. Don't get me wrong. I am a totally open-minded person and willing to try new stuffs. Also do I like using black beans for cooking. (See my yummy  veggie burger recipe here)    But, tell me, how could you use black beans for baking to make sweet treats? But, since I read Wheat Belly a year ago, I got really interested in wheat-free, gluten-free cooking & eating. Honestly, I can't stop eating wheat product or baking bread or cakes. But, whenever I find a good gluten-free recipe, I try it at least once, to see if I like. My friend was so convincing that I got really curious. So, let's say, I tried this recipe out of curiosity. And also, baking different ingredients is fun! 
And you know what. I loved it! It's really really good. It was so good that I baked a second batch right away. 

It's true that for most of us, if not all, who have been so used to the chewy and soft texture and taste of wheat/gluten, gluten-free food taste is an acquired taste instead of a natural one. But, this chocolate black bean cookies are amazingly delicious both by conventional and unconventional means.

If you have craving for chocolate and sweet stuff, one chocolate black bean cookie may reduce your craving for a while. Also, beans fill your stomach. It also is a great afternoon snack!
  
Here goes the recipe for the Chocolate Black Bean Cookies~
(adapted from My new roots)

Ingredients
1 ½ cups black beans, very soft (or one 15 oz. can)
2 tablespoons coconut oil
1/3 cup 100% cocoa powder
1/4 teaspoon coarse sea salt
1/3 cup maple syrup (or honey, agave syrup)
2 tablespoons chia seeds (or ground flax seeds)
1 teaspoons vanilla extract
1/3 cup chopped dark chocolate (80% or higher)
1/4 cup chopped dried cherries (optional, or use dried cranberries)

Directions:
1. Preheat oven to 375°F (or 190°C). 

2. Rinse and drain beans.
Chop dark chocolate.
2. Mix chia seeds, maple syrup, and vanilla in a bowl and set aside. 

3. Place drained and well-rinsed beans, coconut oil, cocoa, and salt in a food processor and blend until well combined. 

4. Add maple syrup and chia mixture and pulse to incorporate. The batter won't be hard or doughy, but still hold together.  

5. Remove blade from the food processor and add chopped chocolate (and cherries if you use them). Fold to incorporate. 

6. Spoon cookie batter onto baking sheet. Flatten top of cookies slightly with the back of the spoon, as they will not spread when baking. 

7. Bake for 15 minutes until the edges are browning. 

Cool and eat. Store in the fridge.

Don't they look good? :)
They taste even better than they look.

Happy baking!

Chocolate Black Bean Cookies

Wednesday, December 18, 2013

[Slice-and-Bake Sugar Cookies] Versatile Cookies for Any occasion - Easy to make

I was asked to bring some treats to share at the refreshment after the kids' Christmas recital of their music school. There were different things you could bring, but I obviously picked baked goods as I love baking. :) I baked my signature eggnog cake and made a couple dozens sugar cookies. I know that I call so many things my signatures. But, I can't just pick one! You can see my 'signature eggnog cake' recipe here:
http://heavenlypalate.blogspot.ca/2012/02/eggnog-cake-german-eggnog-cake-that.html

There are thousands of sugar cookie recipes. Sugar cookies are easy to make. Some decorations may be tricky.  But, usually simple sprinkles are enough. I've been subscribing Everyday Food for a few years. Now it became an appendix(?) to Martha Stewart Living, but it was a separate publication until last year. I've kept every single issue of this small magazine, but one of my favorite ones are the special issues for holidays. Especially 'Holiday 2006' edition - Collectible cookie edition is the one I use the most.


I like making sugar cookies since they are such versatile treats that can be decorated in many different ways. I rolled the log over the sprinkles this time. It takes one minute to decorate, but the plain sugar cookies transform into Christmas sweets!

Here goes the recipe for the Slice-and-Bake sugar cookies.
(Adapted from page 38 Everyday Food, Holiday 2006 edition)

Ingredients
(makes 24. You can simply double the recipe to make more!)
1 + 1/2 sticks (12 tablespoons) unsalted butter, room temperature
3/4 cup sugar
1 large egg yolk, room temperature
1 teaspoon vanilla extract
2 cups all-purpose flour
1/2 teaspoon salt
sprinkles or sugar (optional)


Directions

1. With an electric mixer, beat butter until light and fluffy, scraping bowl as necessary.

2. Add 3/4 cup sugar, and beat until combined.

3. Beat in egg yolk and vanilla.

4. Add flour and salt and beat until combined. Don't over-beat!


5. Transfer dough onto a piece of parchment or waxed paper. 

6. Using the paper so dough won't stick to your fingers, roll into a log, about 2 inches in diameter.

7. Wrap well, and twist end of paper to seal. Refrigerate until firm, at least 60-90 minutes. I usually make the dough ahead and refrigerate for a couple of days. You can leave the log in the fridge upto a week, or freeze up to 3 months in a resealable bag.

8. Preheat oven to 350 degrees Fahrenheit (or 180 degrees Celsius).

9. When ready to bake, roll the log in the 1/2 cup red or green decorating, if desired, to coat.

10. Slice the log into 1/4-inch-thick discs.

11. Place on a baking sheet, and bake until golden brown, about 15 minutes. I overcrowded the baking sheet since I had too many to bake, but if not, please don't overcrowd the sheet. 

Otherwise you will end up with the misshaped cookies stuck with each other, like mines:(

12. Let cool 5 minutes, then transfer cookies to a wire rack to cool completely.

They are crumbly and heavenly :)

Enjoy!

Slice-and-Bake Sugar Cookies