Search This Blog

Showing posts with label Cooking - Sandwich. Show all posts

Thursday, August 29, 2013

[Breakfast Burrito & Omelet in a bag] All-in-One Camping Breakfast Menu

What is your favorite or most important meal of the day? Mine is breakfast. I can have an apple for lunch and skip dinner, sometimes. But, I can never ever ever miss the breakfast. Without breakfast, I cannot survive a day. I bake bread, cake, pie or muffins at night, not to eat those right away, but to eat for breakfast. Sometimes, it's not a really convenient habit, but many people told me it was better to eat substantial food in the morning than to indulge food at the dinner. So, I decided , long time ago, to like my habit. And my habit didn't change while camping. A long time habit doesn't go away that easily. :) 

So, we had a tasty breakfast each morning while camping, of which I'm going to share the recipes, if you can call it recipes. They are so basic and easy.

If you want to see my camping post, click the links below:

We all like to have a different breakfast, lunch and supper when camping, don't we? Or maybe it's my family specific thing. To be honest, I can eat anything for breakfast. Give me a steak at breakfast. No problem. I will finish it. I can eat a big sub sandwich for breakfast, too. :) When camping, we had a breakfast burrito for the first morning and a bagged-in  boiled omelet for the second morning. You can be creative and put whatever ingredients you like. They will harmonize as one item. :)

Here goes the recipes. References were for "method," not for the recipes.
First, 
<1> Breakfast burrito!

Ingredients
1 egg / person
1 red bell pepper
1 yellow bell pepper
1 onion
1 potato large
4-8 breakfast sausages
1/2 cup sour cream
8 tortilla
Salt & pepper
Cajun seasoning (optional)
Cheddar cheese, grated (optional)
Vegetable oil, for pan

Directions

1. Dice bell peppers, potato and onion.

2. Cook onion until onion becomes transparent. Cook belle peppers and potato. Season with salt and pepper, and (optionally) Cajun seasoning and transfer to a dish.
3. Cook sausage and dice.
4. Whisk eggs and scramble eggs on a medium heat.

5. On each tortilla, layer with bell pepper, onion, sausage and scrambled eggs at one end.

6. Top with 1-2 tablespoons of sour cream.

7. Fold the wings and roll it up burrito style!

It's a very simple recipe. 

You can put each ingredients as much as you want or as little as you want, it still tastes great!

<2>Boiled omelet is even simpler than breakfast burrito.
One of the reasons why we made boiled omelet one day and breakfast burrito the next day was that they have almost the same ingredients.

Here goes the recipe:
(Adapted from Boil-in-bag omelet)

Ingredients
2eggs / person
1 red bell pepper
1 yellow bell pepper
1 onion
4-8 breakfast sausages
Salt & pepper
Cheddar cheese, grated (optional)
Vegetable oil, for pan

** You can prepare all the ingredients, except for eggs, ahead. So, feel free to double the amount of the ingredients when you make breakfast burrito, and save half for bagged omelet!

Directions
1. Boil a large stock pot of water.

2. Divide cheese, pre-cooked meat & veggies to the zip lock bag. 
3. Add 2 eggs in each Zip Lock heavy duty (freezer type) bag and season with salt and pepper.

4. Seal (zip) the top (removing as much air as possible) and mix everything by squishing the bag.

5. Place sealed bags (zipper side up) into the boiling water, and keep an eye on them. 
6. They usually cook in about 10 minutes to be done, but it depends on how many you are cooking and the size of the pot, it may take a little longer or shorter. 

As we put 4 bags all together it took us almost 15 minutes to cook.

7. Open the bag and let the cooked omelet roll out on a plate. It has a funny shape. But, it tastes great!


Enjoy!

Breakfast Burrito & Boiled Omelet

Monday, July 16, 2012

[Upgraded sandwich] Arugula - The easiest trick to add value to any sandwich

Before I write, I must let you know first that this should be a really quick memo-like posting.
I just want to share my super easy trick to upgrade a sandwich.
What is your favorite lunch item (at work or at school)?
I like all kinds of leftovers  :)
However, my real favorite lunch would be sandwich.
I enjoy any kind of sandwich from a simple ham & cheese one to a gourmet Niçoise sandwich.
(My favorite sandwich in the whole world is club sandwich.
What is your favorite filling in your sandwich?
(The above is cabbage tuna sandwich)
As I said above, I am not picky with the ingredients.
However, there is one thing you can add quickly before topping a sandwich with a slice of bread.

 There must be a lot of different final touch to add value to sandwich such as roasted red pepper or marinated artichoke heart. But, the only thing is that most ingredients for final touch matches only with very specific types of sandwich.
However, this final touch works for nine out of ten sandwiches, based on my extensive experience.
Guess what it is.
  
It's baby arugula. :)
You can also call it rocket salad or rucola.
It is a leaf vegetable, which has a peppery flavour as strong as a herb like basil. It is rich in vitamin C and potassium. It has been cultivated in Italy, but now grows in various places in the world.
I like arugula in general because of its rich peppery bitter taste.
It is such a refreshing green leaf I dare to toss in any salad.
I prefer baby arugula to full-size arugula.
I use only baby arugula for my sandwiches, but it's up to you.
I'm growing arugula in my vegetable garden, but it seems that I need more than what I grow.
 I pile this much to my sandwiches.
Arugula has such a powerful distinctive taste which matches surprisingly, but perfectly with any other ingredients.
  Trust me and add baby arugula leaves on top of all other fillings.
  
I am very certain that you would love it. :)

Baby Arugula


Sunday, April 1, 2012

[Tuna melt] Quick & nutricious & cheap meal - $2000 saving project

I decide to save $2000 by scrimping, until August.
I have to share my needs to skimp, to a certain degree, on food.
I filed Mr.D's and my tax return at the end of February. I file my tax return as soon as possible, only to get refund :) We had been students for long time and we've been sharing our paycheques with daycare :(, so we still have lots of credits and deductions.
Well, we had a grand plan since a couple of years ago, to use our 2011 tax refund to fund our 2012 summer vacation.
By the time I completed the return, I got to know that we were short, by a lot, from what we had expected. Well, we didn't earn enough (probably), or we didn't pay enough tax (unlikely).
Sigh... to be honest, tax refund never meets your expectation, does it?
The reality is that you think you pay a lot of tax, but get too little refund.

But, what can you do. We can't really give up summer vacation what we had planned for over a year.
It means a lot to us, just to give up. Yes, it is a lot of money. But, I have to find some way out. How can we disappoint our kids who have been dreaming about this summer vacation for quite a while?
I don't think I will be able to squeeze $2,000 out of grocery portion until August.
I should put $200 aside from each paystub, which would be a miracle. :D
But, I'll do my best. Do I sound too frugal?
I'm trying hard (I spent $131.58 less in March, according to the household ledger, than February :) I'm getting there you see. :)

 So, I'm flipping through, or scrolling through the recipes that can feed my family with a budget.

Here goes the first one, Tuna melt. :)

I love tuna, from canned tuna to sashimi grade. Of course(?) my favorite is sashimi, but it is almost impossible to find sashimi grade tuna here in Ottawa. There are a couple of Japanese restaurants in Toronto area, where they offer tuna sashimi delivered by UPS from Japan. And the price is accordinly astronomical.
Well, I am fine with canned tuna for now. :)

Tuna melt is defintely comfort food with a little gourmet twist. :)
It makes a mouth watering meal within 20 minutes from start to finish.

Ingredients

2 cans white tuna in water, drained
2 Tablespoons mayonnaise + more to spread
2 Tablespoons onion, chopped
1 Tablespoon caper
1 teaspoon lemon juice
1/4 teaspoon freshly ground black pepper
1/4 teaspoon salt
1/2 teaspoon oregano
1-2 tomato, sliced
6 slices of white bread, such as sour dough or Italian
6-8 slices of provolone cheese


How to make
1. Preheat the oven broiler.


2. In a bowl, mix the tuna, mayonnaise, onion, caper, lemon juice, and oregano. Then, season with salt and pepper.


3. Spread mayonnaise thinly on the slices of bread.


4.  Spread tuna mixture evenly on top.


5. Layer a slice of tomato on each bread.


6. Top with provolone cheese to cover almost entire surface. Some overlapping is fine.


7. Broil on baking sheet in the preheated oven, for 3 -5 minutes or until heated through and golden brown.


This is a very quick fix and delicious. :)

I enjoyed tuna melt with a glass of Chile pinot noir.

Forget Napa valley wines or French champagnes.
I will embrace the new world, one bottle every other week, until August.
Cheesy delight.
And it's lighter than pizza.

Do you have a special reason to be on budget meal?


Tuna Melt


Friday, March 16, 2012

[Muffuletta] New Orleans style sandwich on Sicilian bread

Sandwich is such a versatile food item, along with pizza and pasta.
There are at least 101 different things you can slip in between two (or three) slices of bread.
As a bread lover, I indulge in all kinds of sandwiches.
And I don't ignore good sandwich recipes, which I believe is a natural attitude of a sandwich lover. :)

 
When I read Virginia's muffaletta post, I needed to make it right away!
Well, actually it took a few days before I executed my compulsive desire for muffaletta.

The muffuletta is a type of round Sicilian sesame bread and also a submarine sandwich made with muffaletta bread.


Muffuletta is originated from Sicilian bread, or pano Siciliano.
I had thought about baking muffuletta bread for a few minutes before giving up the idea because of sesame. Pablo is allergic not only to nuts, but also to sesame. He wouldn't be able to eat this bread even if I bake it. So! I decided to use store-bought panini bread and cheese bread. :)
I still think I'll bake this yummy bread soon, but without sesame.


Muff was made first at by the founder of the Central Grocery, a Sicilian grocery store in New Orleans.
According to Marie Lupo Tusa, daughter of the The Central Grocery's founder, the origin of the Muffuletta sandwich of which nickname is "Muff" was quite spontaneous.

"One of the most interesting aspects of my father's grocery is his unique creation, the muffuletta sandwich. the mufuletta was created in the early 1900's when the Farmers' Market was in the same area as the grocery. Most of the farmers who sold their produce there were Sicilian. Every day they used to come of my father's grocery for lunch.
They would order some salami, some ham, a piece of cheese, a little olive salad, and either long braided Italian bread or round muffuletta bread. In typical Sicilian fashion they ate everything separately. The farmers used to sit on crates or barrels and try to eat while precariously balancing their small trays covered with food on their knees. My father suggested that it would be easier for the farmers if he cut the bread and put everything on it like a sandwich; even if it was not typical Sicilian fashion. He experimented and found that the ticker, braided Italian bread was too hard to bite but the softer round muffuletta was ideal for his sandwich. In very little time, the farmers came to merely ask for a "muffuletta" for their lunch."

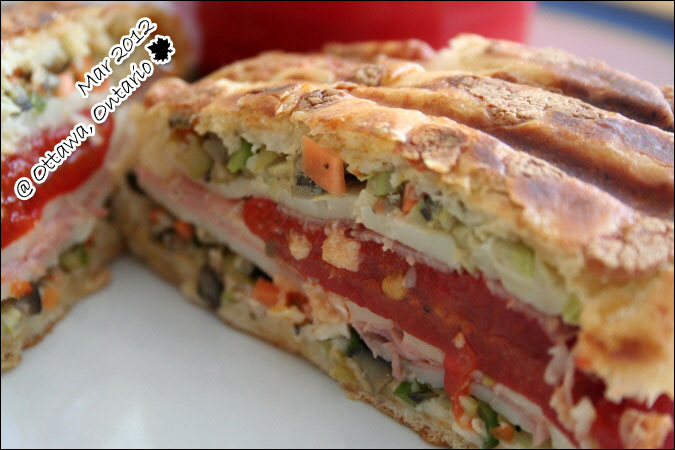
Muffuletta sandwich didn't disappoint me. It was as good as I had expected. :)
Abundunt cold cuts and cheese make the bread uber rich and tasty,
the real crown of the sandwich is olive salad, or New Orleans style olive tapenade.

I love almost anything made with olive and one of my favorites is olive Tapenade. (Tapenade is a Provençal dish consisting of puréed or finely chopped olives, capers, anchovies and olive oil.) As you see the ingredients of tapenade, the color of tapenade is brown-black. On the contrary, New Orleans style olive salad/tapenade, is pretty colorful thanks to carrot, celery and artichoke hearts.
It's my first time tasting it. It was so good. I'm sure I'll make it often.
I'm sure you will love it too.

Once you make the tapenade, everything is so easy :)

There are a couple of differences between Virginia's recipe and my sandwich is as follows: :)

1. I put only about 2 tablespoonful of chopped jalapeno instead of 1/4 cup as Virginia's recipe suggested, because of the four people: My kids can't anything spicier than mustard. None of two adults in my household digest spicy food well. But, if you like spiciness, feel free to add 4 tablespoons of chopped jalapeno.
I didn't know that Mr. D threw away the jalepeno that had been staying in the fridge about a month!! I added jalepeno later after I came back from the supermarket only for that jalepeno.

2. I used red wine vinegar instead of pomgranate one since I could not find such an amazing vinegar.
   
Here goes Virginia's muffuletta recipe:

Ingredients
(6 servings)

STEPS 1 - olive tapenade
1 cup black olives (measured before chopping), finely chopped
1 cup green olives pimento stuffed (measured before chopping), finely chopped
1 cup marinated artichoke hearts (measured before chopping), finely chopped
1/2 cup chopped carrots
1/2 cup chopped celery (1-rib)
1/4 cup capers (measured before chopping), finely chopped
1/4 cup [hot] jalapeños (measured before chopping), finely chopped
2 [large] garlic cloves, finely chopped
1 teaspoon Italian seasoning
1/4 teaspoon celery salt
1/4 cup pomegranate vinegar
1/4 cup extra-virgin olive oil

STEPS 2 (Muffuletta sandwich):
6 panini rolls (such as Dutch Crunch)
Olive Tapenade from steps 1
12 slices Sopressata salami
12 slices Mortadela
6-12 slices roasted red bell pepper (depending on size)
6 slices Swiss cheese
6 slices Provolone cheese
(6 slices jalapeño jack cheese) - I used only Swiss and Provolone

How to make:

Step 1 - Olive salad/tapenade


Ingredients are all chopped and ready to be mixed :)

1. In a bowl ,mix all ingredients until well blended.

2. Once well mixed, cover the bowl and chill for at least 4 hours or overnight so that the flavors of olive and artichoke blended into "deliciousness." :)
I made it the day before and it was perfect! 

Now it is very easy to assemble.
Once the sandwich is assembled, it needs to be grilled so that provolone & swiss cheese in the sandwich can be melted.

STEPS 2 (putting the sandwich together)


1. Half/split bread lengthwise

and spread some of the olive salad mixture evenly on both sides of the bread.
2. Begin layering: begin with cheese on top of olive salad.

and the middle layer with the roasted pepper and slice of cheese (cheese of choice), close the sandwich.
and end with cheese (your choice of cheese).

Now the Muff is read to go on the grill.

3. Generously butter or rendered bacon grease or olive oil for brushing on outside of bread (top and bottom)
- As I preferred crispy and dry texture of the bread, I didn't brush any grease.

4. Place onto a pre-heated Panini grill or similar kind.

George Foreman grill works as good as any panini grill. 

Tara~

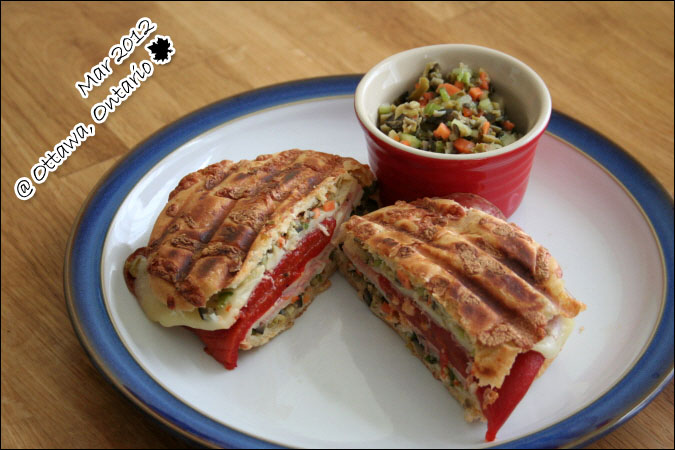
It looks like a fat panini sandwich.
(I love panini sandwich as well :))


I used my perfect-cute-sandwich-size George Foreman grill Remi gave me as my birthday present :) 

Isn't it really cute? :)

I love this grill. I decided to keep this grill forever.
Cooking time would vary depending on your grill. In my grill's case, it needed 4 minutes to show me nice golen stripes :)

Cut the Muff in half and serve with a side of your choice :) 
This is a real gourmet Sandwich.
 You should try it!

Thanks Virginia, for the great recipe!

Muffuletta