Search This Blog

Showing posts with label Cooking - Accompaniments. Show all posts

Wednesday, July 10, 2013

[Rhubarb Strawberry Compote] A Great Way to Enjoy Rhubarb - Delicious accompaniment to Ice Cream

This year's first strawberry picking was a great success, not because of the strawberries, but mainly because of the rhubarb with which I made compote! 

I didn't know until this year that the Ovens farm also has "pick-your-own" rhubarb! :) Unfortunately, there is no photo of rhubarb patch because of the drizzling rain.

We go to strawberry/raspberry picking every year, simply to pick the most fresh strawberries and enjoy the field. 

It's not necessarily cheaper to drive down to Osgoode and pick our own strawberries, but we can pick small and pretty berries. 

I love all kinds of berries. It's why I love late spring/summer since berry prices go down so much. Last weekend, we went to Ovens Berry farm in Osgoode. 

It became our routine to go there at least a couple of times every year. We met up with a friend's family for the picking. It started drizzling, but it didn't bother the picking much, while it did hinder shooting photos. :( It still was fun  even without many photos. 

We were lucky that they just had started raspberry picking. And for the first time at Ovens farm, I pulled a few stalks of rhubarb. 12 stalks of rhubarbs were for the compote which could be also called fruit sauce. I paid $3 for 12 stalks. I made the compote in that evening. The compote made with 12 stalks of rhubarb and 2 pounds of field strawberries are almost gone now :( I should have bought more rhubarb. 

We paid $18.72 for all of these.
We are thinking going back to the Ovens farm very soon. If the only way you consume rhubarb is to make pie filling, how about making this yummy rhubarb compote?  Compoter verb is 'to stew' in English. So we could say that compote is a fancier name of stewed fruit. :) Compoter, or stewing, is the most forgiving and flexible way of cooking. You can add or reduce the amount of any of the ingredients mentioned in the recipe(?). Also, a couple of minced ginger will give a nice flavour to the sauce. Here goes the recipe. The photo of the ingredients was too blurred to use :(. But I can assure you that this recipe has the simplest ingredients!)

Ingredients
8-12 stalks rhubarb
2-3 lbs strawberries
1/2 - 1 cup sugar (according to your taste)
1/4 cup water
2 tablespoons minced ginger root* (optional)

Directions
1. Wash and slice rhubarb crosswise. You don't need to slice or chop too fine. Anyway it will lose its shape once stewed.

2. Wash before you halve or quarter strawberries.

3. Place strawberries and rhubarb in a heavy-bottomed large saucepan.

4. Combine all ingredients.

5. Bring to boil, stirring until sugar dissolves. 
Reduce heat to medium-low; simmer until rhubarb is very soft and begins to fall apart, stirring occasionally, about 3-40 minutes.
So easy, eh? :)

You can serve it warm, room temperature, or cold. It's right at any temperature :)

I've brought it in a ziploc container for my snack to work three days in a row~ It's much nicer than apple sauce.
It's good by itself.

But, the best of the best ways to enjoy rhubarb compote is topping the vanilla ice cream. It's such a delightful treat for anybody!

Enjoy! :)

Rhubarb Strawberry Compote

Thursday, June 13, 2013

[Three-Bean Salad] A classic barbecue favourite side dish

Grilling is fun and something to look forward to. But, you can't only eat grilled meat or fish by itself, can you? You enjoy your meat/sausage/fish more when there is nice accompaniment, usually of carbohydrate, such as rice, cold pasta, or corn on the cob. 

A perfect side dish gives a wonderful accent to your summer barbecue. This three bean salad is great not only for barbecue side dish, but also for meatless lunch box. I make it a large quantity, only to have leftover for the lunch of the following day. It sounds funny, but it's refreshing, but filling at the same time. I don't know why, but I don't make this salad in winter, maybe because green and wax beans are too(?) expensive in that time of the year, or maybe it doesn't seem warm enough to eat in  cold weather. 

In any case, this is just the right time of the year to eat this three-bean salad. I already know that you will love it, because it's really really good! :) I've made this salad over and over, but never met anybody who didn't like this salad. 
Here goes the recipe.
(adapted from Everyday Food)

Ingredients
8 oz (240g) green beans, 
4 oz (120g) yellow wax beans, 
1 can (15 oz) cannellini beans or navy beans, rinsed and drained

or following ingredients
2 tablespoons Dijon mustard
2 tablespoons red-wine vinegar
2 tablespoons olive oil
Coarse salt and ground pepper

Directions

1. Remove stem ends of green beans and yellow wax beans. Set a steamer basket in a large pot with a lid. Fill with enough water to come just below basket; bring to a boil.
Place green and wax beans in basket; reduce heat to a simmer. Cover pot, and steam until beans are crisp-tender, 3-4 minutes. With tongs or a slotted spoon, transfer beans to ice water. Drain, and pat dry.
You can halve the beans on the diagonal either before or after you cook.

2. Meanwhile, drain and rinse navy beans with cold water.

4. If you are using Marie's dressing, see here. Otherwise,
In a medium bowl, whisk together mustard, vinegar, and oil; season with salt and pepper. 

5. Add green, wax, and cannellini beans; toss to coat. 

This salad goes very well with any kind of meat or fish.

Three-Bean Salad

Tuesday, May 21, 2013

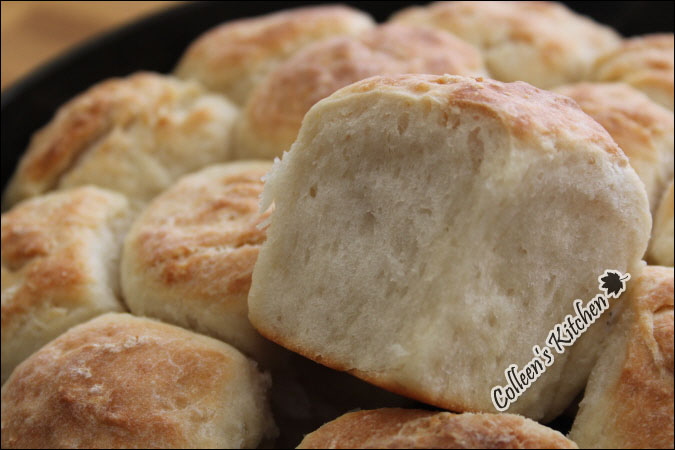
[Sourdough biscuits] Old fashioned Sourdough Biscuits like the past - Great accompaniment for Soup or Steak

How was your Victoria day?

I wanted to bake sourdough biscuits for the fourth weekend in a row, but didn't have a chance.

Instead, I baked a Victoria sponge cake, yes, upon request. Remi who always is curious of all kinds of foods and wants to eat different things everyday is my inspiration for cooking & baking, indeed. Remi asked, since a week ago, if we could have a Victoria Sponge cake for Victoria day breakfast. We sometimes eat cakes for breakfast, as I try hard not to eat sweet treats in the evening. 

So I baked sponge cake last night and spread jam and whipped cream in the morning just before the breakfast. It's so good, especially with black tea, I can understand why queen Victoria often had a piece of this cake with her afternoon tea.

It was a busy day working at backyard and having a barbecue lunch that  I couldn't make any sourdough biscuits or bread this weekend. So, I didn't have a choice but throwing a cup of sourdough starter before replenishing withe a cup of flour and a half cup of water. :( As I wrote already in my sourdough starter recipe post, you need to feed your starter regularly, at least once a week, as it is a living thing, i.e. bacteria. If you don't want to end up with too much starter, you need to get rid of one or two cups of starter, before replenishing with the same amount of flour and water, by using it for baking, or less preferably, throwing out.

I'll make a big loaf of sourdough bread next weekend. I will post a sourdough bread recipe soon. It's really good, too. Today let me show you a very easy sourdough biscuit recipe as I said last week.

Before the sourdough bread recipe, here goes a recipe for the sourdough biscuits. When you have good sourdough starter, it takes little time and effort to make delicious sourdough biscuits. It smells really good, and you will be surprised how little butter you need to make these biscuits with heavenly flavour. If you are not ready with sourdough starter, you can check how to make sourdough starter here.

 Here goes the recipe for the old fashioned sourdough biscuits
(adapted from Along the trail)

Ingredients
 2 cups all purpose flour
 2 cups sourdough starter
 1 tablespoon baking powder
 1 tablespoon sugar
 1 teaspoon salt
 2-3 tablespoons butter, soft at room temperature, for rubbing

Directions
1. Preheat oven to 400°F (200°C).

2. Grease well a cast iron skillet, Dutch oven or baking dish.

3. Sift flour, baking powder, sugar and salt together into a large bowl.

4. Stir sourdough starter well, before scooping out your portion.

5. Pour the starter into the flour and mix well. 

Now dough is ready. The dough should be sticky and wet but able to hold a shape when rolled.
6. Now rub soft butter on your hands. 

With hands well buttered, roll 2"-2+ 1/2" size balls of dough between your palms. 

7. Place into the greased dish or skillet. Crowd all the rolled balls in. Don't worry, they won’t stick together from baking. Let the dough rest for 10 to 15 minutes before baking.

8. Place in hot oven to bake for 25 - 30 minutes.

9. Biscuits are done when golden brown on top. (I place the biscuits under a broiler for a few minutes at the end of baking, to get the golden brown top.)

These biscuits are the best when they are just out of the oven. Serve hot with butter and jam. I served biscuits with breakfast gravy the other weekend. It was also delicious.

And as you may have guessed it already, it's a superb accompaniment for a bowl of any soup!

Happy baking!

Sourdough Biscuits

Sunday, April 28, 2013

[Asparagus with Balsamic Butter Sauce] Outstanding Side Dish with Minimum Effort

Asparagus is a wonderful accompaniment for any fish.  Well, actually asparagus add a nice addition to any meal. And this asparagus dish is a real treat for asparagus lovers. For balsamic  vinegar lovers like me, too. :) 


Asparagus will be ready with no sweat and you will enjoy the dish till the last shoot.


I served this asparagus with salmon last time.
(You can see Roasted Salmon with Greek Yogurt Sauce recipe here)

Here goes the recipe for a great Asparagus with butter and balsamic vinegar. (I call it BB(balsamic butter) sauce :))
(adapted from Allrecipes.com)


Ingredients
1 bunch fresh asparagus
1/2 - 1 teaspoon oil (olive oil or vegetable oil) 
salt and pepper
2 tablespoons butter
1 tablespoon soy sauce
1 teaspoon balsamic vinegar

Directions

1. Preheat oven to 400 degrees F (200 degrees C).

2. Trim the ends of the asparagus shoots.


3. Arrange the asparagus on a baking plate. 

4. Coat with oil , and season with salt and pepper.
5. Bake asparagus 12-14 minutes in the preheated oven, or until tender.


6. Meanwhile, melt the butter in a saucepan over medium heat. 

7. Remove from heat, and stir in soy sauce and balsamic vinegar. 

8. Pour the balsamic butter sauce over the baked asparagus, and serve with main dish.


Asparagus with Balsamic Butter Sauce