Search This Blog

Sunday, July 29, 2012

[Gazpacho] The most refreshing soup with multiple vitamins

Gazpacho is my very favorite summer soup.

This is a perfect appetizer on a super warm summer day as it doesn't require any heat.
The only kitchen tool you need is a food processor or a hand blender.
On top of everything,
it tastes so good.
Gazpacho is a perfect example to show that healthy ingredients can also be so tasty.

Gazpacho is a tomato-based vegetable soup from Andalucia region of Spain. Gazpacho is very popular during the summer months because of it chilled serving temperature and refreshing tastes.
It is really seriosly good. :)

 
The recipe I use often is slightly deviated from a classic Andalucia style gazpacho which includes stale bread.
Without stale bread, I find it's even more refreshing and pretty much free of any carbohydrate.

I made it for the barbecue a week ago.
All my friends and Mr.D welcomed the refreshing appetizer before grilled souvlaki and sasauge.

Tomatoes in my vegetable garden were ripe and waiting for me to use them :)

Here goes the refreshing gazpacho recipe:
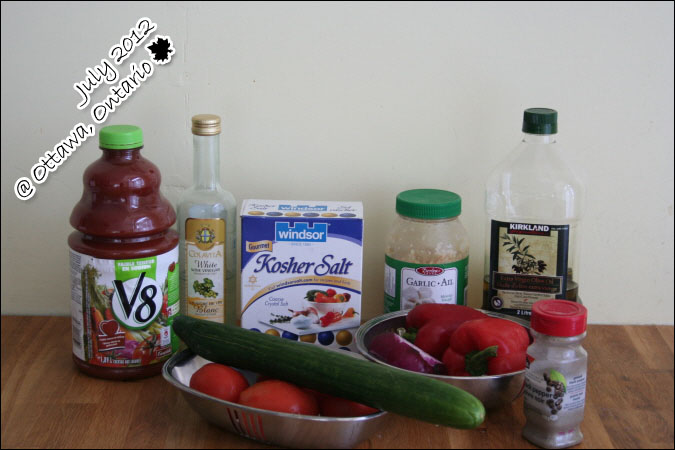
(adapted from Food Network recipe)
Ingredients 
1 English or normal cucumber
2 red bell peppers, cored and seeded
4 plum tomatoes
1 red onion
3 garlic cloves, minced
3 cups tomato juice such as V8
1/4 cup white wine vinegar
1/4 cup extra virgin olive oil
1/2 tablespoon kosher salt
1 teaspoons freshly ground black pepper


How to make

1. Have cucumber halved and seeded. But, don't peel cucumber. I use melon scoop to get cucumber seeded. It works very well. :) 

Dice the cucumbers, bell peppers, tomatoes, and red onions into 1-inch cubes.

 2. Put each vegetable separately into a food processor or a blender fitted with a steel blade and pulse until it is coarsely chopped. Do not overprocess, you want some chunky texture!


3. After each vegetable is processed, combine them in a large bowl.


4. Add the garlic, vinegar, olive oil, salt, and pepper.


5. Add tomato juice and mix well and chill before serving.

It is true that the longer gazpacho sits, the more the flavors develop.

It's also a good item for a lunch bag in a tight container.
Enjoy :)


No-carb Gazpacho


Thursday, July 26, 2012

[Red Velvet Cake] Velouté Birthday Cake with a passionate color

My little baby, aka Pablo, turned 6 last weekend. I can't quite believe time flies this fast.
I baked a red velvet cake for his birthday. He asked a chocolate cake for his birthday party that is scheduled for this weekend, which means that I am asked to bake a giant chocolate cake on Saturday~ fun fun. :) :(
Well, let's go back to the cake of the day :)

Red velvet cake is a layered cake with a red color. The cake can be dark red, reddish brown or bright red. I made a bright red colored cake.

The popular icing for red velvet cake is cream cheese icing. The red color is attained from red food coloring. Well, you may also use boiled graetd beets like old times.
The red velvet cake became popular during the World War II, the cake came into prominence thanks to the recipe of the famous Waldorf Astoria Hotel of New York city.
You can make 24 red velvet cupcakes with this recipe~
Here goes the recipe for the red velvet cake:
(adapted from Joy of baking)

Ingredients
Cake
2 + 1/2 cups sifted cake flour
1/2 teaspoon salt
2 tablespoons cocoa powder, unsweetened
1/2 cup unsalted butter, at room temperature
1 + 1/2 cups sugar
2 large eggs, room temperature
1 teaspoon pure vanilla extract
1 cup buttermilk
2 tablespoons liquid red food coloring
1 teaspoon white distilled vinegar
1 teaspoon baking soda

Cream Cheese Frosting8 oz (230g) cream cheese, room temperature
8 oz (230g) Mascarpone cheese, room temperature
(if you don't have Mascarpone, use another 8oz cream cheese)
1 teaspoon pure vanilla extract
1 cup icing or powdered sugar, sifted
1 cup cold heavy whipping cream (at least 35% butterfat)


 How to make
1. Preheat oven to 350 degrees F (175 degrees C) and place rack in center of oven.

2. Butter two - 9 inch (23 cm) round cake pans and line the bottoms of the pans with parchment paper. Set aside.

3. In a mixing bowl sift together the flour, salt, and cocoa powder. Set aside.

4. Beat the butter until soft (about 1-2 minutes) in a stand mixer or hand mixer.


5. Add the sugar and beat until light and fluffy (about 2-3 minutes).


6. Add the eggs and vanilla one at a time, beating well after each addition. Scrape down the sides of the bowl.
7. In a measuring cup whisk the buttermilk with the red food coloring.


8. With the mixer on low speed, alternately add the flour mixture and buttermilk mixture to the butter mixture, flour in three additions and buttermilk in two additions, beginning and ending with the flour.

In other words, the order should be flour buttermilk flour buttermilk and flour.


9. In a small cup combine the vinegar and baking soda.

Allow the mixture to fizz and then quickly fold into the cake batter. 


10. Divide the batter evenly between the two prepared pans and smooth the tops with an offset spatula or the back of a spoon, as quickly as possible.

11. Bake in the preheated oven for approximately 25 - 30 minutes, or until a toothpick inserted in the center of the cakes comes out clean.


12. Cool the cakes in their pans on a wire rack for 10 minutes. Cool the cakes completely on a rack. Once the cakes have completely cooled, wrap in plastic and place the cake layers in the refrigerator for at least an hour (or overnight), to make handling of cake easier.

How to make Cream cheese frosting

1. Beat the cream cheese and mascarpone cheese until smooth, in a standmixer or with a hand mixer.

2. Add the vanilla and icing sugar and beat until smooth. 

3. Using the whisk attachment, gradually add the heavy cream and whip until the frosting is thick enough to spread. Add more sugar or cream as needed to get the right consistency.

When both cake and frosting are ready, you are good to assemble the cake.

Peel the parchment paper off the cake.

Cut each cake layer in half, horizontally. I used a horizontal cake cutter, but you can simply cut the cakes with a serrated knife. 

You will now have four cake layers. Place one of the cake layers, top of the cake facing down, onto your serving platter.

Spread the cake layer with a layer of frosting. 
Place another layer of cake on top of the frosting and continue to frost and stack the cake layers. Frost the top and sides of the cake.


You can garnish the cake with cake crust. (optional)

It's a soft sponge cake that melt in your mouth :)
Enjoy.

Red Velvet Cake

Monday, July 23, 2012

[Creamy Salmon Pasta with Broccoli] A perfect meal

Unfortunately, we don't have many choices of seafood here in Ottawa, compared to maritime provinces or west coast even though both Mr.D and I love seafood :(
That is why we really look forward to this summer vacation where we will eat seafood everyday :)

Being inland kids, my kids are not big fans of seafood, which is a shame.
They love fish & chips that cannot go into a seafood category by any means, at least in my norm.
However, salmon is one exception~ and they love salmon.
  Salmon broccoli pasta with creamy sauce contains all the ingredients my kids savour. Remi and Pablo love pasta, cream sauce, broccoli and salmon. Accordingly, this is one of their very favorite pasta. Of course, Mr. D and I love it, too.
I think I make it almost once a month.
This is a forgiving recipe. So feel free to add more salmon or broccoli.
I didn't realize we were out of fettucini and linguini until the moment I put the pasta pot on the stove. So, I had no choice but using spaghetti pasta.
However, I definitely recommend fettuccine or linguini, i.e. large and long pasta, for this creamy salmon sauce.
Here goes the recipe.
Ingredients
(4 servings)
450g/1 lb long pasta, e.g. linguini or fettuccine
3 tablespoons olive oil
2-3 garlic cloves, thinly sliced
1-2 broccoli head(s), cut into florets
8 oz (240g) fresh salmon fillets
1 + 1/4 Cup whipping cream
salt and pepper

How to make

1. In large pot of boiling salted water, cook broccoli florets until softened, about 2-3 minutes.
2. After scooping the broccoli out with a slotted ladle, cook pasta al dente, i.e. tender, but firm, about 8 minutes for linguini and 9 minutes for fettuccine. 
3. Meanwhile, panfry salmon both sides. Drop salmon in the heated pan and cook over medium-high heat.
4. In a large saucepan, heat olive oil over medium heat; cook garlic, stirring occasionally, until softened, about 3 minutes.

5. Add salmon and break into chunks.
 6. Pour whipping cream in and season with salt and pepper.
7. Add cooked broccoli and mix well.

8. Add pasta and coat with creamy sauce.
Now the pasta is ready to be served.
As I wrote above, you may add more salmon or/and broccoli.
Bon Appétit!


Creamy Salmon Pasta with Broccoli